

ELECTRIC HORN—HIGH FREQUENCY MODELS
Electric horns are adjusted to give their best performance before leaving the Works, and will give long periods of service without any attention.
Servicing
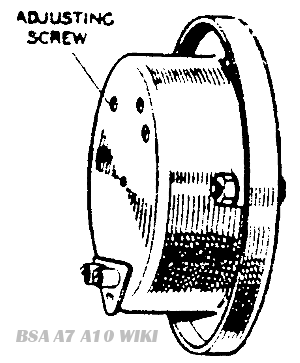
Fig. Y26. Typical electric horn, showing adjustment screw.
If the horn becomes uncertain in action or does not vibrate, it does not follow that the horn has broken down. The trouble may be due to a discharged battery or a loose or broken connection in the horn wiring.
The performance of the horn may be upset by the fixing bolt working loose, or by the vibration of .some part adjacent to the horn. To check this, remove the horn from its mounting, hold it firmly in the hand by its bracket and press the push. If the note is still unsatisfactory, the horn may require adjustment, but this should only be necessary after a very long period of service.
Some models have no adjustment screw at the back of the horn. Adjustment is carried out by means of the grub screw and locking collar which are revealed upon removal of the large domed nut on the front of the horn. Take care that the large nut securing the sounding disc is not disturbed. The locking collar requires a special tool, or a large screwdriver with the blade ground so as to leave two projecting prongs, in order that it may be undone. No attempt should be made to loosen the collar without a proper tool as it is very tight and may become damaged so that it cannot be removed. The adjustment should be carried out in a similar manner to that described for the other type of horn, but the locking collar should be firmly tightened after each adjustment as this affects the note.
Method of Adjusting
The adjustment of a horn does not alter the characteristics of the note but merely takes up wear of vibrating parts.
If the horn is used repeatedly when badly out of adjustment, due usually to unsuccessful attempts at adjustment, the horn may become damaged, due to the excessive current which it will take. When testing, do not continue to operate the push if the horn does not sound. If. when the push is operated, the horn does not take any current (indicated by an ammeter connected in series with the horn) it is possible that the horn has been adjusted so that its contact breaker is permanently open.
After adjusting, note the current consumption, which must not exceed 3—4 amperes. A horn may give a good note, yet be out of adjustment and taking an excessive current. When adjusting do not attempt to unscrew the nut securing the tone disc or any other screw in the horn.
The adjustment is made by turning the adjustment screw, usually in a clock-wise direction. The underside of the screw is serrated, and the screw must not be turned (or more than 2 or 3 notches before re-testing. If the adjustment screw is turned too far in a clockwise direction, a point will occur at which the armature pulls in but does not separate the contacts.